About Course Presentations
The Course presentation content type allows you to create a
slide-based presentation of your learning material. Elements such as images, text, slide
titles, links, audio and video clips can be added to create slides. Various quiz types such as multiple choice questions, fill in the blanks and true or false questions can also be embedded seamlessly into the presentation for a richer learning
experience.
When to use Course
presentations
Course presentation enables you to author and deliver your
course material directly in your browser. With Course presentations the user can create slides and can add various multimedia and interactive elements to engage the
learner.
Course presentations are used when you want to package a
piece of learning content in a structured and interactive format. Learner’s
swipe through slides to experience the learning material while solving various
quizzes or watching videos along the way.
Try Course presentations as an alternative to presenting
your learning content as PowerPoint presentations, PDFs or text-based web
pages. Course presentations are very flexible to use, as they are simple to
create, publish and edit.
Creating a Course presentation
You can access H5P in Canvas through the Rich Content Editor (RCE), which is accessible via the edit view of Page, Assignment, Discussion Board, Announcement and Quiz questions.
For this example, we will be adding H5P onto a Canvas page. The first thing you will need to do is either open the page you want to embed the H5P content into or create a new page. Then click the ‘Edit’ button which will open the RCE. (You will automatically go into edit mode if you create a new page.)
Next, you will need to locate H5P in the RCE toolbar by clicking on the H5P icon.
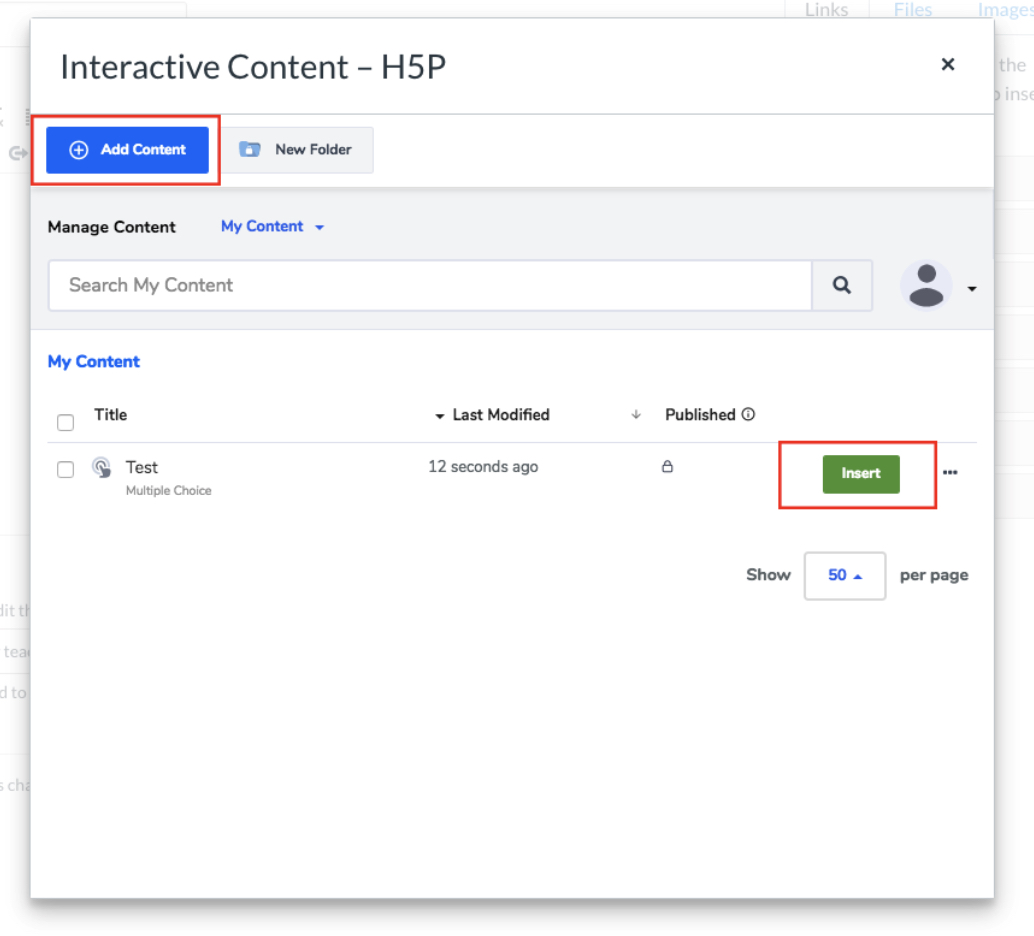
Clicking on that menu item will open a pop-up showing your H5P library.
Select the Add Content and then type Course Presentation in the search bar
The Course
presentation editor
The Course presentation editor should now appear.
The top
part of the editor looks like this:

The content creation happens in the top part of the
editor, so we'll only focus on this for now.
The end-user view of the Course
presentation will look very similar to the editor's view.
Creating a Simple Slide
By default you will be looking at Slide 1 underneath the various options to the edit the slides.
You will see in the bottom of the slide in the middle 1/1 which means this is the first slide and you have only 1 slide.
Firstly you need to create a title for your slide.
When you have a few slide titles you can then use these titles to navigate between the slides.
Press the slides icon  button on the bottom left corner.
This will bring up the title of your 1st slide which will say No Title.
Press the pen icon

next to
No Title to add
a slide title.
In this example we have used the title Cloudberries for our slide.
You should now have something like this:
Now we can move on to adding some images.
Note
the license information and URL and save the pictures to a local folder.
Add the pictures by using the  button
in the top toolbar.
button
in the top toolbar.
Press this button, drag it to where you want the image to
be placed and drop it there.
This is an example of what the image will look like on your slide depending on where you place it.
A dialog will automatically open once you have placed your image on the slide.
Press the  button,
browse to where you saved your picture
and select it for upload.
button,
browse to where you saved your picture
and select it for upload.
Add the licence information to the Metadata  section.
Add Alternative Text to the image. The Alternative
text is used to describe the image as an alternative to
being displayed.
The Hover text will
show up on devices using a mouse when the cursor hovers over the image.
In this example you can now see the flower image on the slide.
You can resize
the picture by pulling in the lower right corner of the image.
If you want to make the image smaller in size move it by using the drag feature.
If you place it in the top left corner, so you get something like this:
You can add a second picture.
By using the same procedure as above. when you do so, you
should now have something like this:
To
finish this slide, use the Text tool  to
add a block of text to the slide.
to
add a block of text to the slide.
Once you have dropped the text box on the slide where you want it located, a dialog
will appear.
Insert the text below in the Text section:
Leave the other fields blank and press Done.
You
can place and resize the text block in the same way as images.
Position and size the text block so that you end up with something like
this:
Creating a slide with Images & Text
Press the  button
in the lower right corner of the editor to add another slide.
button
in the lower right corner of the editor to add another slide.
Our slide 2 will contain information about where
Cloudberries can be found.
Add the slide title Where to find them? in the slide 2 panel, similar to the way you added the Slide 1 title.
We have used a map picture from Wikipedia to show where cloudberries grow in the wild.
Add your picture by using the  button
in the top toolbar.
button
in the top toolbar.
Drag the picture onto the slide, upload the picture
and add license information.
Press Done, then resize
the picture so you have something like this:
To finish this slide, add text if required.
This is done as on slide 1, use the Text tool  to
add a text box to the slide.
to
add a text box to the slide.
Once you have dropped the text box, a dialog box will
appear.
Insert the desired text in the Edit text dialog box.
You can now navigate between the slides by pressing on the slide titles in the
slides panel on the left or by using the arrow/s either side of the slide numbers in the bottom middle section below the slide.

Creating a slide with links
Add pictures by using the  button
in the top toolbar.
button
in the top toolbar.
As on slide 1, place the pictures in a column on the
left side of the slide.
Insert the your pictures, add the appropriate license
information, place and resize them.
Use the Text tool  to
add a block of text to the slide.
to
add a block of text to the slide.
Once you have dropped the text box, a dialog
will appear.
Insert the text above in the Edit text dialog.
Press Done when you're finished. You should now have
something like this:
Finally we will add a link to the slide.
Use the  button
on the toolbar.
button
on the toolbar.
A dialog box will pop to add in the details about the link.
Fill in the details on the link including what text you want to appear on the slide and what link you want to use.
Press Done. then resize and place the link box.
This is what your slide would look like
Creating a Summary Slide
Press the  button
to add a slide.
button
to add a slide.
Add the slide title Summary in the slides panel.
The Summary will
allow the learner to make an interactive summary of the most important aspects
of the previous three slides.
On the toolbar, press the  button
and drag a summary onto the slide.
button
and drag a summary onto the slide.
Once you have dropped the Summary, the editor will appear.
Add statements to the Summary.
Press
the Add statements button to add two more statement
groups.
In
the Summary editor, the top statement in a statement
group is always the correct one.
Add the relevant information and press Done when you
have finished adding the statements.
Then position and resize the Summary so you'll have something like this:
Finishing up a course presentation
Save and Insert to view your finished Course
presentation.